Slate is a multifunctional material that can be used not only to create a roof, but also for other purposes. As an example, we can use beds from slate, which will also be discussed in this article.
The story about the use of slate will begin precisely with alternative options for its use, and only then we will go directly to laying it on the roof.
Content
Creating beds from slate
Making ordinary beds is not so simple, and there are a lot of troubles with them, however, the use of slate greatly simplifies this work. Slate allows you to organize plantings so that all work can be performed with minimal labor. Moreover, it is very durable, so you can not worry about its destruction due to contact with organic substances.
The beds made of slate are also attractive from an aesthetic point of view, since they look very neat. It is impossible not to say that laying slate in the grounds for beds is a very simple job.
Asbestos cement in the sheets does not have "contraindications" as such. Some experts believe that the effect of this material on soil properties has not been fully studied, so it can be a hazard. On the other hand, one cannot fail to note such a fact as the possibility of creating effective protection against the bear, which is obtained by digging sheets of asbestos cement to a great depth.
When used to create beds, this material shows another drawback. It manifests itself in the possibility of heat exchange between the outer and inner sides of the leaf, due to which the soil also warms up and the rate of water evaporation increases. Obviously, high beds of slate need to be watered much more often.
The technology of the construction of beds
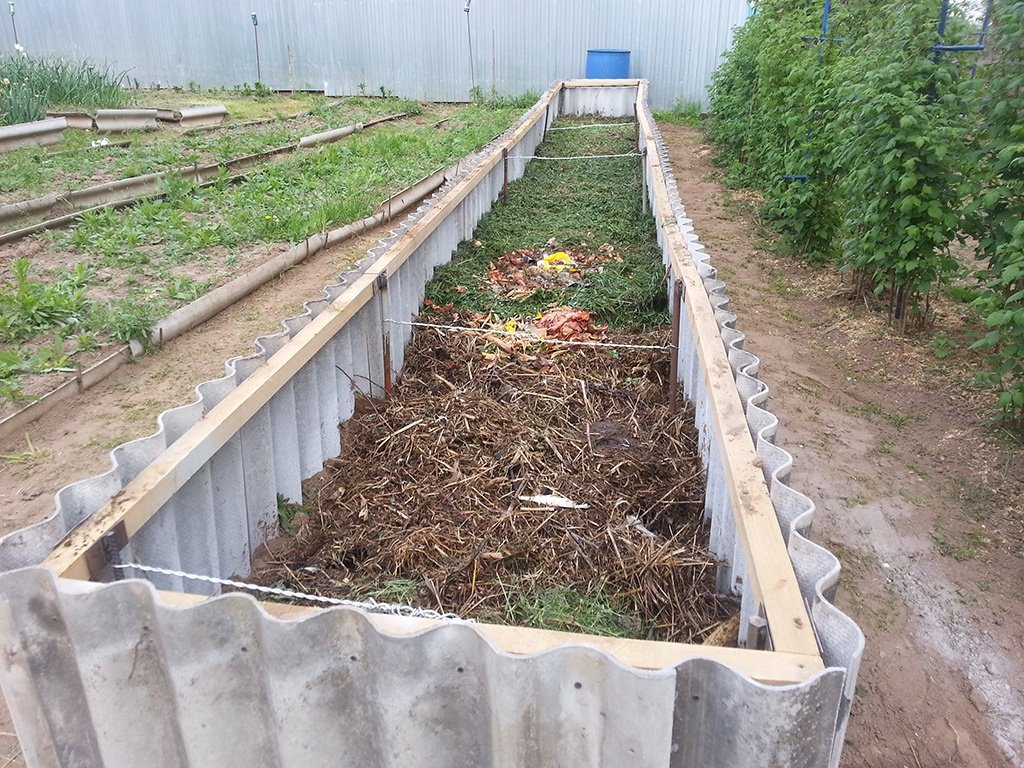
You can use two types of material - wavy or flat. In the first case, the waves need to be cut across, for example, using a “grinder”. Then prepare the installation site - a shallow trench. Sheets are placed in it, after which the soil is poured and rammed on both sides.

To keep the sheets securely, it is best to tamp the ground not only inside the trench, but also outside and only then fill the soil under the plants inside.
Flat slate is also a good solution for a garden. In this case, you will have to work with sheets 1.75 meters long, which are easiest to divide in half, and only then begin the installation of slate. Obviously, the resulting beds will be exactly the same width. To avoid sprawling, sheets are best bonded to each other. To do this, you can use trimmed metal corners.

Fasteners will not hurt to be painted, as they will often interact with water and organics, so corrosion can occur very quickly.
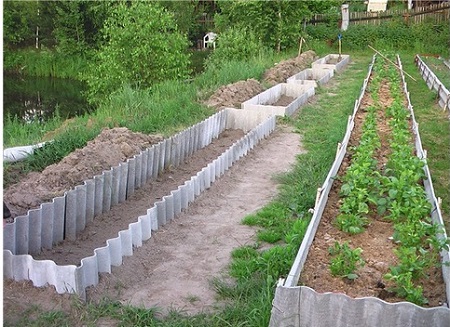
The resulting result is a bed 10-15 cm above the ground, which will allow the earth to warm up well. The second positive point of using this design is to deepen the sheets by 20 cm, so the roots of other plants do not penetrate the beds.
To connect together the individual elements forming the walls of the beds, aluminum corners can also be used. Before you make beds from slate, you need to prepare a large number of caps from plastic bottles.They will play the role of plugs at the ends of the screws, protecting your hands from scratches.

Some gardeners believe that since the slate is thick, you can simply drive it into the ground and not mess with the creation of a trench. This approach is attractive only at first glance, since if a pebble, thick root or ordinary rusty nail gets under the lower edge of the sheet, the latter may crack.
Preparing the roof for the installation of slate
The main attraction of slate is that it is a simple and durable material that, if properly installed, can last quite a long time. Another fact in the treasury of the positive features of such a roof is the ability to do the installation of slate with your own hands.
Preparation provides that the place of work will be carefully studied, and the number of required sheets calculated. It is worth recalling that the most promising for such material are pitched roofs, which have a simple shape.

In the process of choosing the type of sheets, you need to take into account that the material consumption depends on the number of waves (there is a 6-, 7- and 8-wave). For example, when laying in a run-up, it is the latter option that shows itself better, since the consumption of such material will be slightly lower than when laying slate with 6 waves.
Wavy slate can also be used in regions where a lot of snow falls during the cold season, but it should be used only on roofs with a slope steeper than 25 degrees.
Crate Creation
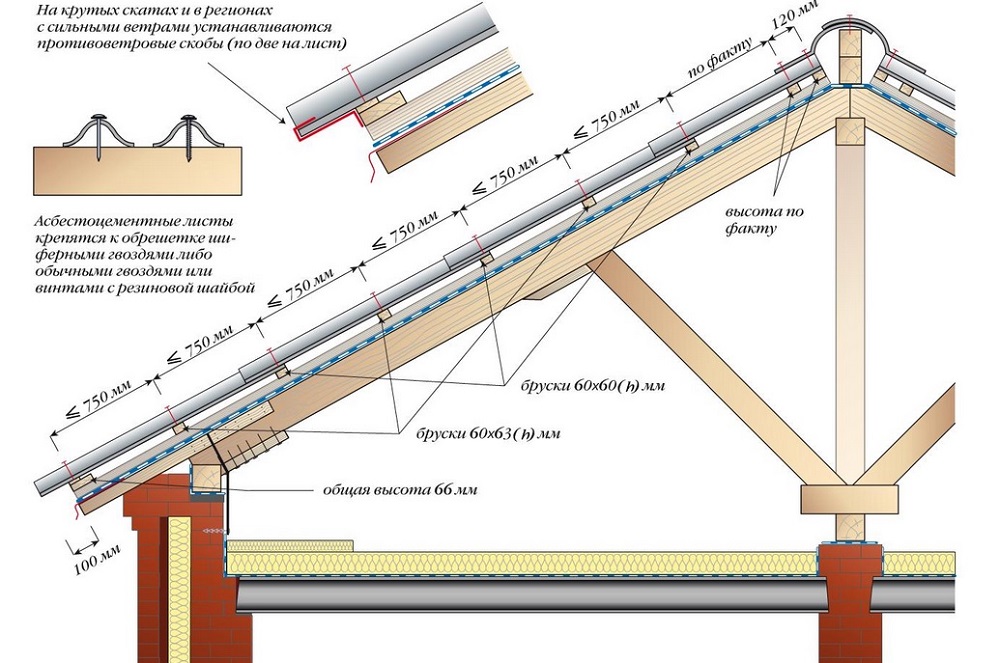
To securely fasten slate sheets, you need to create a crate. As a rule, this is a lattice structure made of boards, but sometimes a bar with a section of at least 60x60 is also used. The choice of the step of the crate is made so that each sheet of material is attached to at least three bars. Given the length of the slate, the average distance between the horizontal elements of the crate will be up to 750 mm.
To create a roof ridge, you can use a bar 60x120 laid close to the top of the roof. It is better not to experiment with a curved beam or boards, since slate is not flexible, which means it will not be able to hide the defects of the crate.
How to cover the roof with slate
Installation of sheets should be done with an overlap of several waves. The vertical overlap should be more than 20 cm to prevent possible leaks. In the transverse direction, laying is carried out from left to right. Vertical laying is from bottom to top, with the top sheet overlapping part of the bottom. In relation to each other, the sheets may be shifted in the same wave relative to the layer laid below, and may have aligned edges.
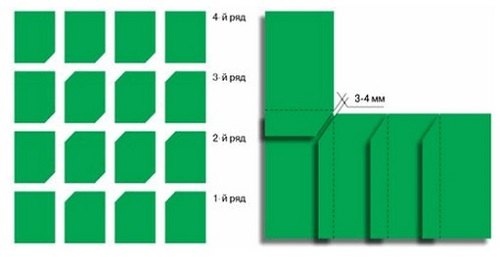
Slate overlap in height requires the use of a special crate, the height of the bars of which alternates. To achieve this effect, one of them (for example, even ones) needs to be built up with wooden planks, 3 mm thick. Such an approach will allow to obtain the necessary density with a longitudinal overlap of sheets.

Before covering the roof with slate, you need to make sure that the material does not have any damage or factory defects. Also, the correspondence of the actual slate length with the declared one is checked and the corners or longitudinal stripes of the sheets are trimmed.
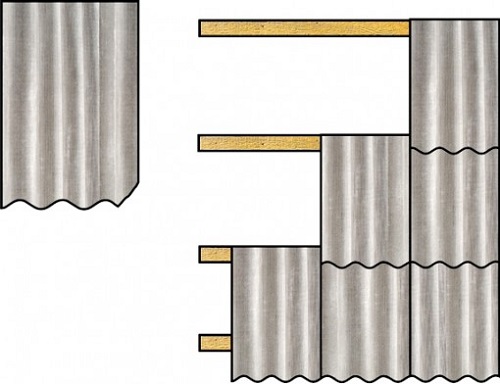
The first stage of installation is the lifting of sheets on the roof. This procedure is simple to perform, you just need to lift them one at a time. Work should start from the lower left edge. The rows are stacked sequentially, taking into account the fact that certain overlaps must be observed.
Holes for mounting elements need to be drilled. Any modern electric drill can easily cope with this task, but you should choose the right drill. Its diameter should be 2 mm larger than that of the fastener.
The slate is laid using special nails that have a rubberized or metal washer. The puck itself must be coated with a composition based on natural drying oil and hammer with a hammer through the hole in the block. The coating compound emerging from under the washer clearly indicates that it is not necessary to press the sheet harder.
The nail head itself is also coated with the same compound. It is worth saying that it is best to paint it under the general gamut of the roof when the applied mixture dries.
How to put slate on the skate
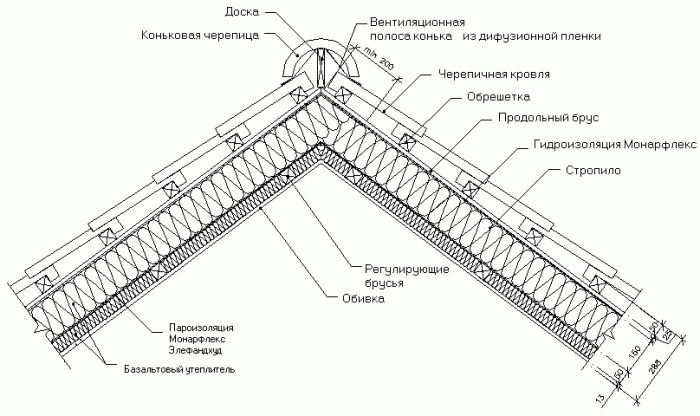
The skate is a weak spot of those roofs that were laid by slate non-specialists, since it is he who needs to pay the lion's share of attention, because most of the rest of the work is not difficult.
A beam is mounted on the ridge, from two sides of which two further battens are fixed along the length. After the slopes are already covered with slate, the brackets necessary for the installation of portable bridges and the ridge bar are attached to the beam on the ridge. The upper edge of the latter is rounded in accordance with the radius of the slate used. The entire length of it is covered with rolled material and the laying of asbestos-cement sheets on the ridge begins.
The next stage is the installation of the skate KPO1, after which they put the skate KPO2. The first of them is located with a wide bell in the direction of the pediment. Then, the holes for the fasteners are marked, after which two holes are drilled through both skates on the longitudinal axis of the wave and a pair of holes on the flat tops of each ordinary skate. The holes in the lapels must pass through the crests of the waves.
The slope adjacent to the edge of the roof is covered with spacers. People who know firsthand how to cover a roof with slate know that the so-called oblique parts of sheets are called. The dimensions of these elements can be determined on the spot. They are laid along the rib beam or fixed to the crate. On top of the rib, roll material is installed at least 35 cm wide, and then KPO skates are laid in pairs. Their fixation is carried out according to the same scheme as on the roof ridge.
Flat roof slate
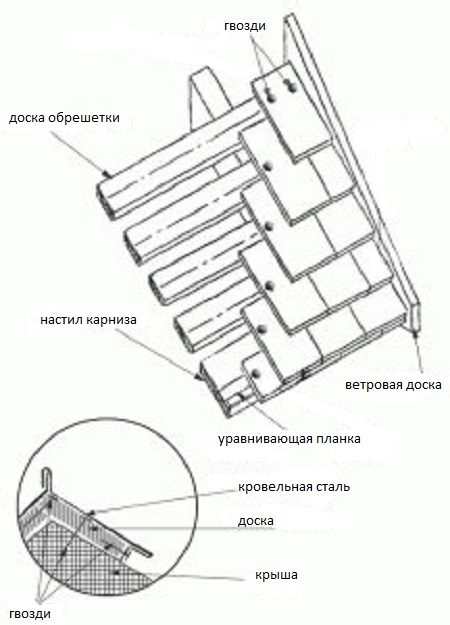
Such material today is more often found in the form of fences or as an element of some temporary construction, but it can also be used for equipping the roof. It is worth saying that the laying of this type of slate is somewhat different from the method described above.
The first difference is the type of crate. It should be solid and have a marking in the form of rectangles with sides 235 and 225 mm, respectively. You can apply such sheets on roofs with a slope of more than 18 degrees.
The general rule for mounting sheets is the same as for wave. It is necessary to lay sheets with an overlap, and one should also take into account the prevailing wind direction in a given area.

Slate sheets should not create a continuous joint, so it is advisable to start each of the odd rows from the whole sheet, and even from its half.
A do-it-yourself slate roof is made using plates of steel and galvanized iron. The former are mounted on cornices, and the latter are needed for installation in valleys. Pipe sheathing is done with a steel apron. The final stage is the installation of the roof ridge.
For the installation of sheet material, special nails are used. The technology of its installation and insulation is the same as when using a wavy variety of asbestos-cement sheets.
Roof care
Obviously, it is not enough to know how to properly cover the roof with slate, since this material requires some care. It is worth saying that one of the simplest ways to increase the durability of the roof is to use acrylic paint. It will not only paint gray material in bright colors, but also allow it to withstand damage well due to adverse effects.
In any case, roof care will not hurt. For example, regular cleaning of the coating material from debris will significantly extend its service life. Wet twigs and leaves contribute to the rapid destruction of the material.
In the case when it is necessary to paint the old slate, then first it must be cleaned of lichens, moss and plants. Of course, it is worth thinking about painting before covering the roof with slate, but it is still needed. To prevent the growth of lichens and mosses, an antiseptic is applied under the primer layer, which prevents the development of any plants.
If leaks appear in the material, then the slate sealant is easy to deal with. It is just needed to eliminate the effects of small cracks. In the case when the scale of destruction is large enough, it is necessary to replace the sheet with a new one.
To summarize the above, it is worth noting the wide possibilities for the use of asbestos-cement sheets, but they are not very suitable for roofs having a complex shape. For example, a large number of valleys and external ribs makes the installation of such material too difficult, therefore, in such cases, the installation of a roof of a different type is carried out.



Alas, no comments yet. Be the first!