
When installing a roofing cake, you can not do without a crate. But during its installation, there are many subtleties. What material to choose, with what step to install and how many battens will be required on the roof? These questions need to be dealt with before the start of installation work. Features of the roof will depend on the chosen coating. You can make a crate for a metal tile with your own hands.
Lathing device
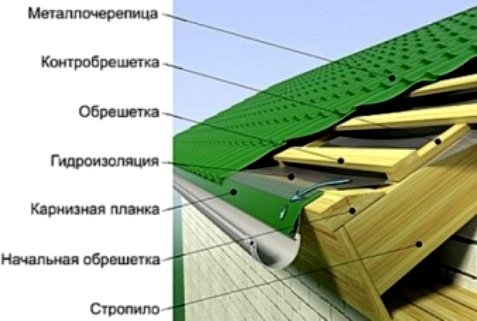
The lathing under the metal tile is an edged board, which is installed with a certain step for fastening the roofing sheets. And their thickness is determined in accordance with the angle of inclination of the slope, the pitch of the rafters, the height of the snow cover.
As a material, you can use coniferous trees. The most common pine boards.
The sheathing scheme of the crate must be selected before the installation work begins. Its type will depend on various parameters:
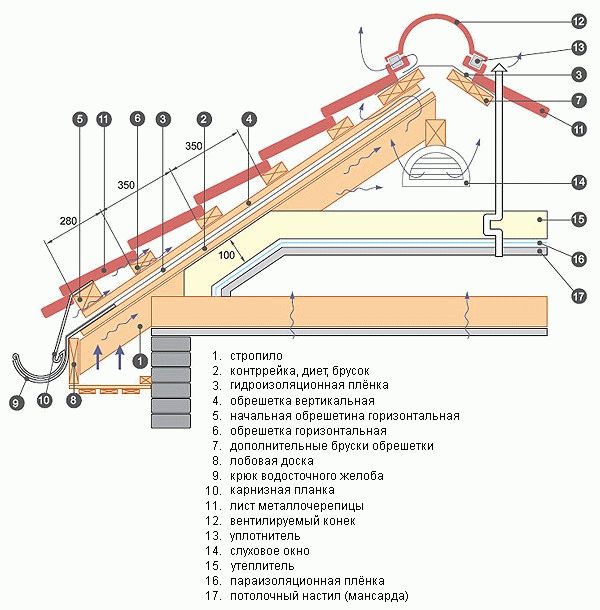
- If there is a heated under-roof space, you will need, in addition to waterproofing, laying a counter-lattice, which will create a ventilation gap. Such an event will ensure the removal of water vapor from the insulation.
- A counter-rake is not needed when installing the crate on a cold roof. In this case, a waterproofing in the form of a film is used, laid on the rafters, which will provide additional protection for the under-roof space from snow and rain, which can fall under the joints of a metal tile, ridge or curtain eaves under the influence of strong wind.
The step of the crate will depend on the type of metal tile. Different manufacturers offer different cell sizes. These recommendations should be indicated in the instructions for the roofing material purchased.

So, for example, for a Monterrey metal tile, a crate with a step of 35 cm is required, and for Maxi - 40 cm.
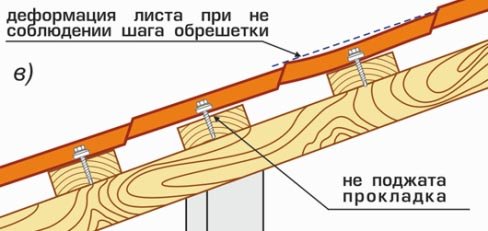
The crate must be installed without violating the required step. Otherwise, errors can lead to problematic installation of the roofing.
The process of installing the crate under the metal tile itself must be done strictly in certain weather. It should be dry and calm. This will ensure the safety of high-altitude work, and also eliminate the need for additional protection of lumber from getting wet.
For work, you can also use moisture-proof plywood and OSB-boards. Such a crate will create additional strength and give reliability to the roofing cake. The same effect can be achieved by installing a continuous crate of edged boards. But it should be noted that this significantly increases the consumption of material and the weight of the roofing cake.
Material selection
It is better not to save on the material of the crate, which is planned to be laid under the metal tile. As a flooring for such a roofing, only edged board is suitable, which is of high quality and good drying.
Selection options:
- The first and perhaps most important requirement relates to the thickness of the lathing. The optimal choice is a value of 32 mm., But it is also allowed to use edged boards of at least 25 mm. It is best before you purchase the material to independently calibrate the spread of the boards in thickness, which should not be more than 2-3 mm. in one batch.
If the variation in thickness exceeds the required value, then the use of such boards will affect the formation of lattice mismatches on the rafters. And the laying of the metal tile will be uneven, the risk of wave formation is high.
- A suitable board width is between 10 and 15 cm.
- Different lengths of battening are allowed, but it is more convenient to use the appropriate step for the rafter legs. In doing so, waste generation can be minimized.
- A planed board will cost more and is not required to work. Minimum deviations in thickness will have edged non-planed boards, sawn on a good tape sawmill.
- Before installation, the crate is treated twice with a flame retardant and an antiseptic to prevent fire and rot.
The most suitable thickness of the boards for the crate will depend on the step with which the rafters are installed. Accordingly, the larger it is, the thicker the boards will be required. For example, with a step of rafters of 90 cm, a crate with a thickness of at least 32 mm is used. And for a step of 60 cm, 25 mm boards are suitable.
Features of installation work
As an example, we will consider mounting the battens on the roof with insulation, because this is the most difficult option:
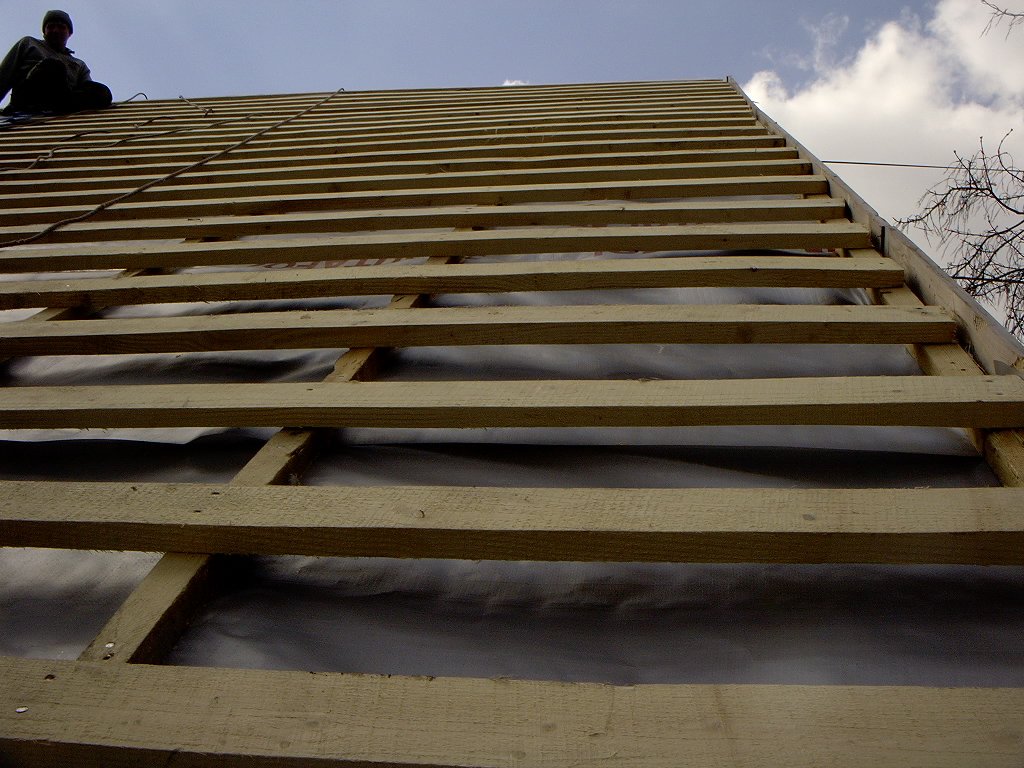
- Before laying the flooring, it is necessary to perform some preparatory installation work. The waterproofing is placed under the metal tile coating, and you need to fix it with a stapler to the rafter legs. Anti-condex film overlaps. Work is carried out, moving from bottom to top of the roof. In this case, a size of at least ten centimeters will be a suitable overlap width.
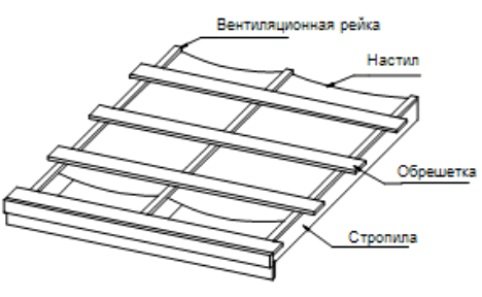
- Next, proceed to stuffing the counter rails. She has another name that reflects the purpose - ventilation rail. For this, a wooden edged beam with a section of 32x50 mm is suitable. You can also use boards with parameters 32x100mm.
Tiling for metal - The counterrail must be laid down, stepping back from the overhang from 15 to 20 cm, and leave a place where the first battens will be fixed. The starting board must be selected with a thickness corresponding to the sum of the thicknesses of the crate and counterrails.
- In the case of installing the first crate on the counter-rail, its thickness should exceed the ordinary elements by 10-15 cm. This will avoid the formation of a hanging ledge on the edge of the overhang.
- Proper installation of the launch pad will require special attention during installation. It must be nailed to the end of the rafter leg, positioning in a straight line. Do it all over the eaves overhang. Next, with the help of screws you will need to screw a vertical board, which is also called a frontal, and a cornice strip of metal.
- Fastening the gutter is carried out to the windshield.
- The first sheet of metal roofing is laid in such a way as to provide a protrusion of 3-4 cm. Over the edge of the cornice strip. This will ensure that snow and rain get directly into the gutter without the possibility of flowing into the under-roof space.
- The most difficult thing is to properly arrange the overhang. Further fastening of the ordinary boards of the crate is carried out using self-tapping screws or nails to the surface of the base, parallel to the starting board.
- With any option for fixing the planks of the battens, it is impossible to prevent the protruding elements from bulging. And their placement should be made in the center of the board. When working with self-tapping screws, it is necessary to tighten the gaskets correctly.
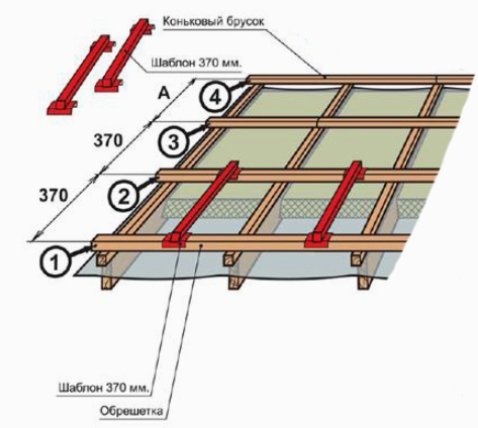
- In order not to make a mistake with the distance of the step of the crate and to simplify the work of constant measurement, you can use the templates. For this, two racks of the appropriate length are suitable. You need to put them on the bottom board, and on the upper part it will be possible to align the next board of the crate.
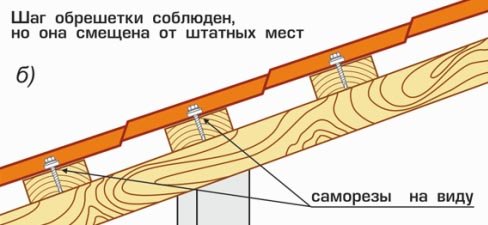
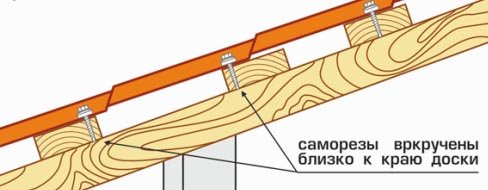
Dimensions and pitch - When working with laying metal tiles on the crate of the ridge or pediment, difficulties may arise with the overview of the fastener places. Sheets will cover the flooring. If you deviate the step of the batten boards, even by a seemingly insignificant couple of centimeters, you can simply miss the placement of fasteners. The consequence is a defect in the form of a through hole to the roofing.
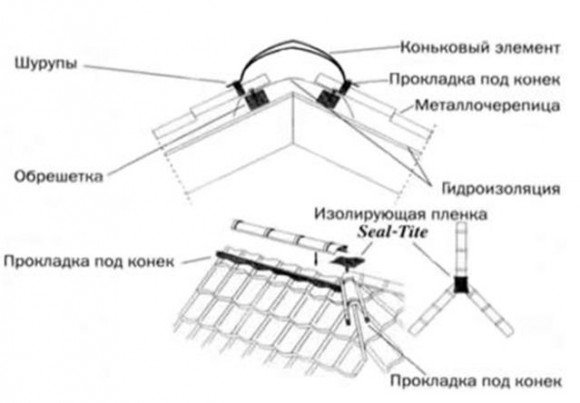
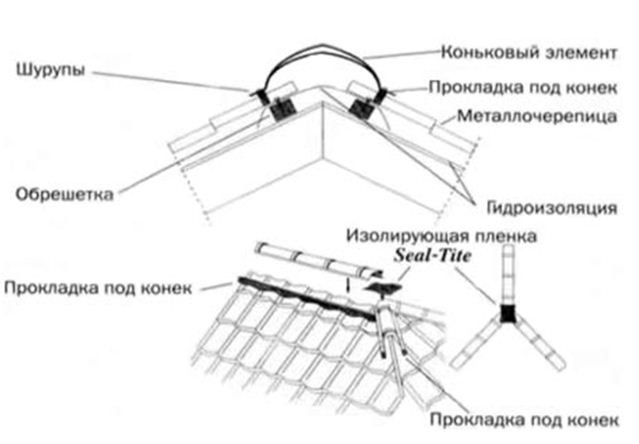
- Another difficult moment in fixing the batten boards is the ridge part.It is necessary to take into account, in addition to the main fastening of the sheet of metal, the installation of a special profile, which will cover the joint along the entire length. In order to provide such an installation, flooring boards of increased width are used. Suppose one more option - installation back to back two narrow battens.
Installation of a roof from a metal tile
If there are additional elements on the roof, for example, snow retainers or stairs, reinforcement of the crate will be required. This can be done by installing additional support boards.
Compliance with the following important rules guarantees you the correct installation of the crate:
- In the place where the crate is adjacent to the ridge, pipe, roof windows or valleys, its step is reduced to a maximum of one centimeter. For these places it is more rational to use a continuous crate.
- Gutters are usually mounted on brackets that must be installed before the installation of metal tiles. The same swinging cornice strips.
- Anti-condensation film will help protect the insulation from moisture. Stack it without tension, and a minimum sag is allowed in one or two centimeters.
- To compensate for linear expansion with a constant change in air humidity, a crate of sheet material is performed with a gap of 3-5 mm. It is also necessary to shift the ordinary sheets of the relative first by a distance equal to half the width. This will increase the strength of the rafter system.


Alas, no comments yet. Be the first!