
Content
What is a pent roof design
The design of such a roof is notable for its simplicity, so you can mount everything yourself without the help of professionals. This will help you save some money. A shed roof for a barn is considered the most economical option, since the material for it is not at all expensive.
Before you make a drawing of a shed with a pitched roof, you must correctly calculate the angle of its inclination - this is what you need to do in the first place. This factor will directly affect the reliability of your entire construction, since we have severe winters, there is a lot of snow, water after autumn rains should quickly drain and not accumulate, otherwise, the building will soon collapse. Make a roof with an angle of at least 20 degrees. It all depends on what material you are going to cover the roof.

The only drawback of a pitched roof is the lack of an attic, or attic. Well, the main advantage is resistance to strong winds. During a storm, or a strong hurricane, a gable roof can simply be torn down by a strong wind, but a gable roof withstands such surprises of nature.
Before covering the shed roof with, for example, a shed roof, you can independently make all the calculations for determining the angle of inclination. But, if you decide to use this type of roof for your own apartment building, it’s better to contact professionals who will correctly calculate and complete the installation. Since during all calculations it is necessary to take into account a dozen factors, including the monthly rainfall.

During installation, do not forget about the air and waterproofing, because the air must pass and exit freely. I have not used similar designs before for residential buildings, but recently they are also used. On all modern projects of residential buildings there are single-pitch roofs, because they are quite practical and multifunctional.
So, now more about our barn. A barn is an important working part of your site, which means that it must be very strong and strong. It must be protected from the effects of weather and the sun. So - we pay close attention to the roof.
The roof for the barn can be made and gable, and gable. It all depends on your personal preference, the design of your site, weather conditions, how developed the imagination of your developers. On small farm buildings, it is recommended to put pent roofs.
As mentioned above, constructing a shed roof is quite simple. The main thing is the calculation of the angle of inclination, which should be at least 10-20 degrees and sent to the back.
There are several ways to provide the required angle of inclination. The first method - low racks are pinned to the upper beam with the help of nails, and then beams for the ceiling are attached to them, again with nails. If the shed is small in width. Then another one is nailed to the front beam. The second way is to build a facade wall above the back. In this case, we lay the ceiling beams on the strapping. There is no need to hem the bottom of a shed roof.
For ceiling beams, thick wooden boards are usually taken. The distance between the beams needs to be done 50-80 centimeters. To protect the roof from the winds, nail the boards with nails and secure with wire.Do not forget that the beams should protrude 25-30 centimeters on both sides of the building
And then the crate is laid on the ceiling beams - this is a board 25 centimeters thick, with a step of half a meter. We begin laying from the front side. On the sides we also make a release of 20 centimeters.
Do not forget that any wooden part must be treated with special means from dampness. The gaps between the roof and the side wall are clogged with simple boards.
Then we just cover the roof with roofing material, we start from the bottom, with an overlap, we fasten it with slats. On top of the roofing material we fix the material for the roof - slate, corrugated board, ondulin. You can stop on another layer of roofing material - that's how to cover the roof of the barn cheap and profitable.
About the device and the benefits of a pitched roof for a barn or garage
Owners of summer cottages and cars have long known that the roof is the weak point of the entire building, which means that it must be made perfectly. That roof will protect your property from thieves, moisture, overheating.
We will tell in more detail about the roof device for the barn and about all its advantages.
If you are thinking about building, look for articles on the Internet like “do-it-yourself shed roof”, also think about the source materials that will be used for construction.
You can’t save on materials, rush too - rush leads to a clear failure, you need to calculate everything, consider all the profitable options.
And we also strongly recommend that you follow all the tips and carefully select the material for the roof.
Even if you are an esthete, it is unlikely that you will want to make a multi-pitched roof for the barn, so that it resembles a fabulous palace.
Undoubtedly, this is beautiful, but in practice it does not justify itself. For example, a gable roof has its own advantages (it is possible to arrange an attic), but strong gusts of wind will blow it, it is especially inconvenient to put it if the shed is firmly adjacent to the house. A gable roof is best done on a thorough garage, especially if the size of the garage allows you to make a whole separate floor on the roof for storing materials and tools.
Conclusion - the most inexpensive and practical roof is a pent roof. The material for it is inexpensive, and it is arranged by simply fixing it to walls of various heights.
Such roofs are most often equipped with simple office buildings - sheds, garages.
We list the advantages of a shed roof:
- simplicity of design, no need to calculate rafter systems for support;
- a pitched roof is easier to cover, you can generally use rolled material and do everything yourself;
- a shed roof is more reliable in the literal sense of the word - imagine how a four-pitched roof withstands the pressure of the wind from all sides.
We calculate the slope

To understand all the subtleties of installing a shed roof, let's look at its features. As mentioned above, the angle of inclination (always) depends on the material that you are going to use and on the weather conditions of your region. The only condition is that the angle of inclination should not exceed 60 degrees and be less than 5. In our country, roofs are made at an angle of inclination of 25-30 degrees.
For each material, it is necessary to calculate an individual slope, which is determined by the main properties:
- For roofing material, the angle of inclination should be done no more than 5 degrees;
- For corrugated board - up to 8 degrees;
- For a metal roof of 18-30 degrees;
- For slate roofs 25 - 35 degrees;
- For tiles and metal tiles up to 30 degrees.
Such differences are explained by the factor that each type of roof reacts differently to the pressure of winter weather and snow.
For example, if light material (corrugated board) is laid at an insufficient slope, it will bend under the pressure of snow and ice, and an increased angle of inclination with metal tiles and slate will cause the docking nodes to leak during thaws.
To build it was more convenient, professionals determined the average optimal angle at which the shed roof should be installed in any of the climatic regions of our country, and guided by these standards, it is more convenient to select and build the roof.
So, in the middle lane of our country, it is necessary to build a roof at an angle of 25-30 degrees, well, if you live in a region where it often rains with snowfalls, you will have to tilt the roof by at least 45 degrees.
How to determine the difference in wall height?
The rafters are the basis for any roof, and they are made of pine, ate without knots.
Before. How to use beams, they are well treated with antiseptics from various insects, as well as special impregnations that give the tree great strength, fire and moisture resistance.
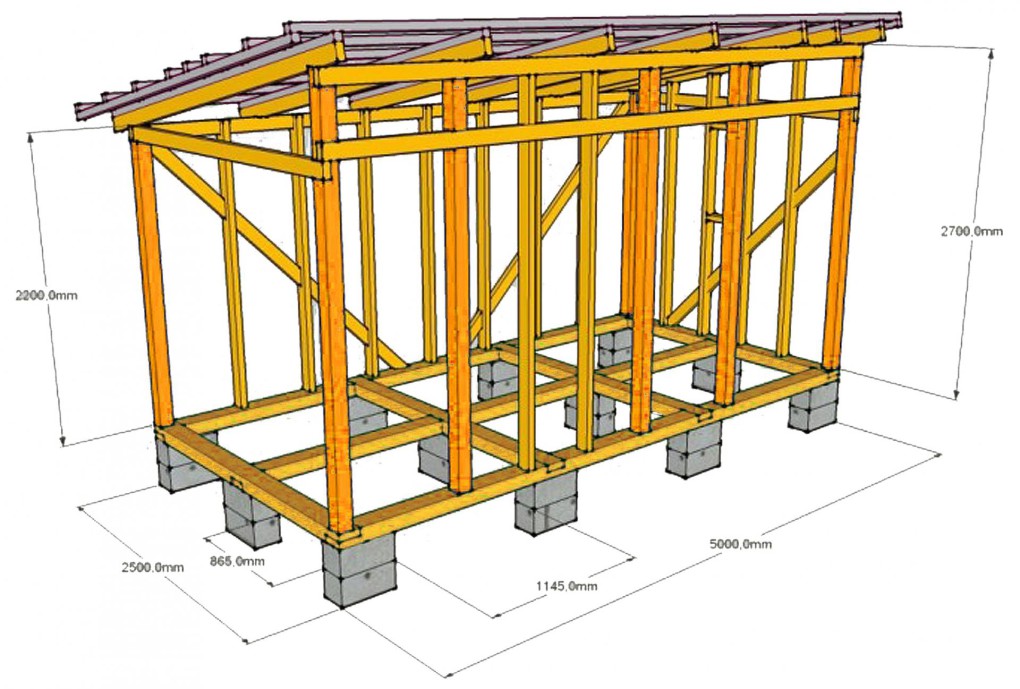
The rafter system for the shed roof of a barn is called an inclined system, and the first thing to do during construction is to calculate the level difference of the walls of the building, which will be needed for the inclination.
To do this, use the function from trigonometry, open a simple school textbook:
So, the difference in all walls is equal to the width of the garage, multiplied by the tangent of the angle of inclination of the roof of the barn.
Let your garage be 5 meters wide and the slope you need is 25 degrees. So, we determine the value of the wall difference = 5 times the tangent of 25, we get 2.33 m, which means that the front wall of the shed should be exactly 2.33 meters above the back wall.
We make a frame for the roof
As stated above, rafters are the main component of any solid roof. The rafters can be built into the walls, or attached to them using Mauerlat beams with dimensions of 100 x 100, or 120 x 120 millimeters - it all depends on the width of the walls of your barn.

Instead of Mauerlat, you can use separate wooden blocks, blocking the gaps between them. Mauerlat are connected to the walls with a long anchor bolt.
Special nests are installed on the surface of the guide beams, which are cut out at a distance of 60-70 centimeters from each other, additionally securing them with anchors, or wire clamps that are worn on a metal rod embedded in the wall.
This is done so that the roof is not ripped off by a strong wind in case of a hurricane.
With a significant roof veche, additional fastenings should be made, it depends on:
- how much the used material for the roof weighs;
- for what loads did you calculate the roof;
If your garage is wider than four meters, then the supporting structure can bend, so, if necessary, support them with bars - struts.
About the crate
The ends of the beams must be removed from the walls by 30–40 mm, and a crate must already be installed on them: a board of boards is nailed horizontally to the ridge, the boards must be strong, dry and treated with antiseptics (be at least 40–50 mm thick). You can also nail the bars.
The density of the crate is determined by the roofing material, therefore, again, you need to determine how to cover the roof of the shed - the heavier the material, the thicker the crate. The joints of all boards on the rafters are staggered.
What should be the crate in order for the shed roof to be strong and wear-resistant:
- Must be strong to withstand weight up to 100 kg;
- Absolutely flat without bulge and bent;
- Whole - absolutely without cracks.
To protect the roof from leaks, take a roller or brush and apply bitumen solution on top, and when the solution dries, the roof is covered again with special bitumen mastic.
How to lay a roof
Then we begin to lay the roofing material on the wooden frame. There are plenty of these materials, all of them can be used to cover the roof of the barn, each has its own advantages.
So, if you are sure that in a couple of years you will build a new barn again, then use corrugated board: it can withstand precipitation, is relatively cheap, and it is very easy to lay it.
The slate roof will also be mounted quite simply, but it also looks good, sometimes it can last up to 30-40 years, but if you have a small barn, then such an expensive coating will not pay off.
The folded roof is also easy to install (it is a coating of thin strips of metal), however, this coating is not at all cheap.
If you are building a barn, or a medium or large garage, you can cover it with tiles or metal tiles.
But most often, if the roof of the shed is being built with your own hands, roofing material is used, or only roll materials for the roof.
They are not expensive at all, but at the same time they are durable, to a considerable extent, they will protect you from rain and snow, and installing such material is simple, it does not take much time. It is important that the roof of rolled materials is inexpensive and easy to repair.
If you put roofing material on a pitched roof, it can last up to 15 years!
At the moment, every day more and more high-quality rolled materials from the “latest generation” appear on the market: euro-grade roofing material and rubemast, whose service life is almost 30-40 years. The technology of their laying and processing is no different from the standard roofing material.
Learning to lay ruberoid
So, our roof is already smeared with bitumen grease, we begin to impose the first layer of roofing material parallel to the roof ridge. The strips must be overlapped with a roof covering of 15 cm. At the edges of the roof, the roofing material bends under the overhang of the cornice and is attached to it.
Then the roof is smeared again and another layer of roofing material is laid. When you glue new strips of roofing material on the laid coating, make sure that the overlap was the same everywhere. Strips of roofing material from the second layer must be laid perpendicular to the first, and then the material is bent under the cornice at the edges and reattached.
The last layer of material is glued in the same way. Do not forget to nail the upper and lower layers with nails for slate every 30-40 centimeters.

If you lay the ruberoid carelessly, voids will appear under it.
Simply put, it starts to bubble. When sticking roofing material, do not forget to smooth it all the time - remember sticking wallpaper, this is done in a similar way. The canvases should be carefully smeared with mastic around the edges - if they are glued loosely, moisture will begin to accumulate under them, which will freeze in winter, and the ice that forms will gradually destroy the roof.
After you put the last layer of material, you must thoroughly clean it of construction debris, and then take the bitumen mastic and cover the roof with a thick layer, as already mentioned, with a brush or roller.
After that, we take fine gravel, or rounded sand and sprinkle the roof, and then we begin to ram the sand, or gravel into the roof.
If you make a barn with heating, then the roof can be insulated additionally. As insulation material, you can use mineral wool, lay it between the bars of the frame.
The final stage is indoor work and ceiling decoration. Usually, ordinary plasterboard or plywood is used for the ceiling of the shed (it is better that these materials are also moisture resistant), but you can take ordinary boards, just do not forget that such a coating will not look as attractive as more expensive materials.
Alas, no comments yet. Be the first!