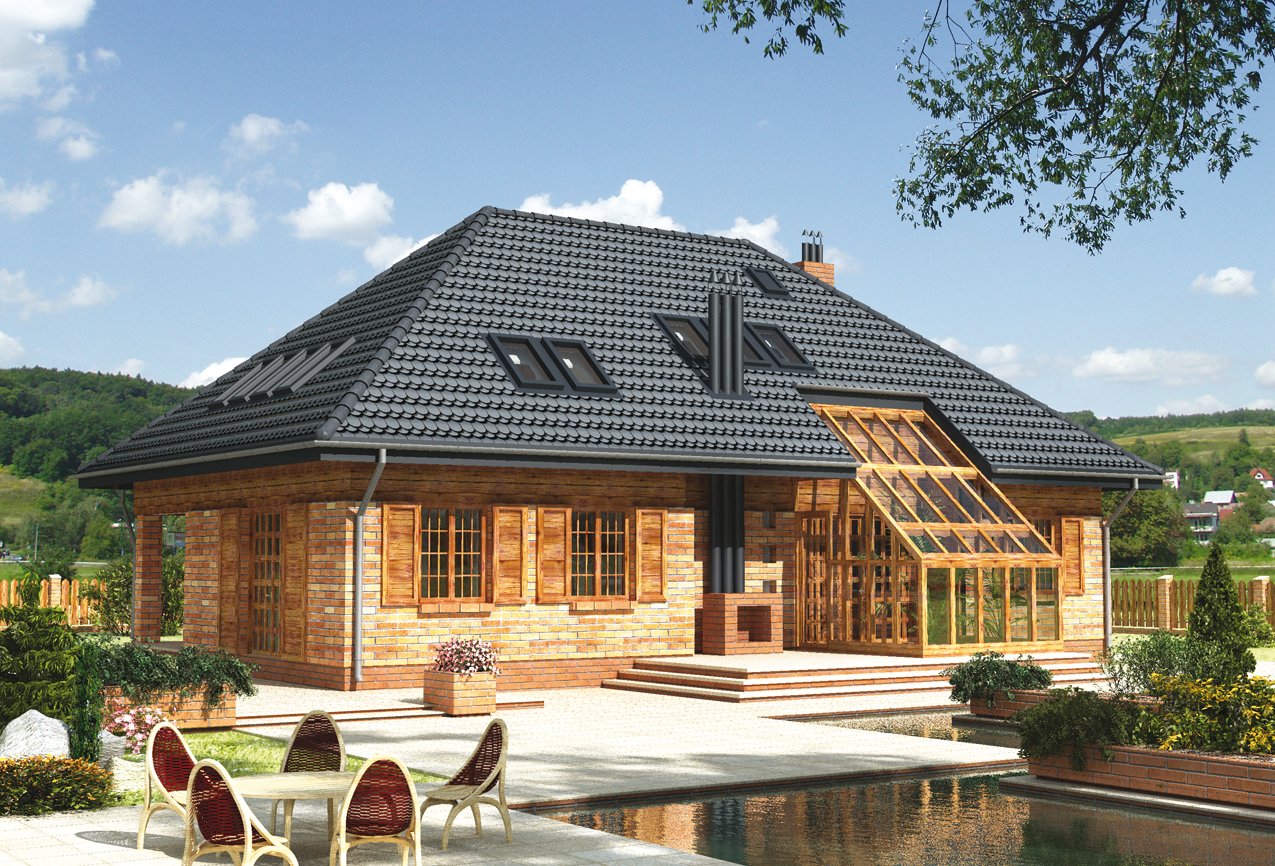
A presentable appearance, reliability, durability - all this is a four-pitched roof, the drawing, the calculation and installation of which, of course, is quite difficult to do on your own, but you can always turn to qualified specialists for help.
A noticeable advantage of four-pitched roofs is that in such buildings it is very convenient to equip the attic floors. The premises are very comfortable and spacious, ideal for living in contrast to houses, for example, with gable roofs.
Currently, more and more buildings made according to such a plan began to appear. Plus a multi-pitched roof - the ability to use on completely different buildings, from the bathhouse to a large private cottage.
Houses with four-pitched roofs look really solid and expensive, and therefore, do not spare the time and money to equip it.
Content
The main varieties of four-pitched roofs
- Hip construction. One of the most difficult of all possible. It is formed by two trapezoidal facade planes and two triangular end faces (they are called hips). This species is especially strong, reliable and has excellent protective properties.
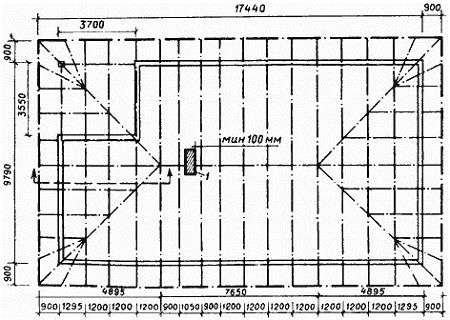
Hip roof scheme
There are no fronts (triangular completion of the building facades, limited on the sides by two slopes of the roof, and at the base of the cornice) on such a roof, and attic windows are located in the slopes.
This roof is much more economical than the gable roof for the cost of wall building materials, but the inclined ribs at the joints of the hips and front slopes require the installation of a very complex rafter structure and additional measurement, fitting of the roofing material.
Slopes are often done with different levels of inclination, which creates the silhouette of a sloping roof.
- Half-hip (Danish) design. It differs from the previous one by the presence of a pediment, which at the top has a small hip. Protection from wind loads at such a roof is provided by the ridge (the upper horizontal edge of the roof, formed due to the intersection of two slopes). Most often, such a roofing device is found in regions with frequent strong winds.
- Tent construction. It looks like a pyramid: four triangular slopes, converging peaks in one place. Such roofs do not have pediments; they are erected on small buildings in the form of an equilateral polygon or square. Installation of the rafter system at such a roof is very difficult.
Creating a gable roof project
Before starting work on the arrangement of the roof, it is necessary to design it, carry out calculations on the structure, as well as create its drawing.
The design of the four-gable roof provides that the slope of the slopes of such a roof can be in the range from 5 to 60 degrees. It depends on atmospheric loads, the purpose of the attic and the type of roofing materials used.

In areas with frequent and heavy precipitation, the slope of the slopes should be significant (from 45 to 60 degrees). In regions with strong winds and occasional rainfall, the slope of the ramps is usually much less.
If the angle of inclination is approximately 5-18 degrees, the use of a roll coating is recommended; 14-60 - asbestos-cement sheets, roofing metal; 30-60 - tiles.
The height of the roofing ridge is calculated using a trigonometric expression for rectangular triangles.
The calculation of rafters is the beginning of the preparation of the entire house project. Their cross section is determined depending on the expected load (the weight of the rafter structures, the roof cake, external influences), and the degree of inclination of the roof. With the help of calculations, the step between the rafters is also determined, their bearing capacity is checked.
The plan of the rafters of the four-pitched roof provides for which rafters it is advisable to use - lay-up or hanging. It also turns out whether additional elements are needed: braces, puffs, etc.
If it happens that the standard parameters of lumber did not fit for the future roof, you can modify them. For example, you can increase the length of the rafters or double the beams. You can also use glued or stacked rafters (they are noticeably more powerful and longer than usual).
The impact of loads on the rafter system
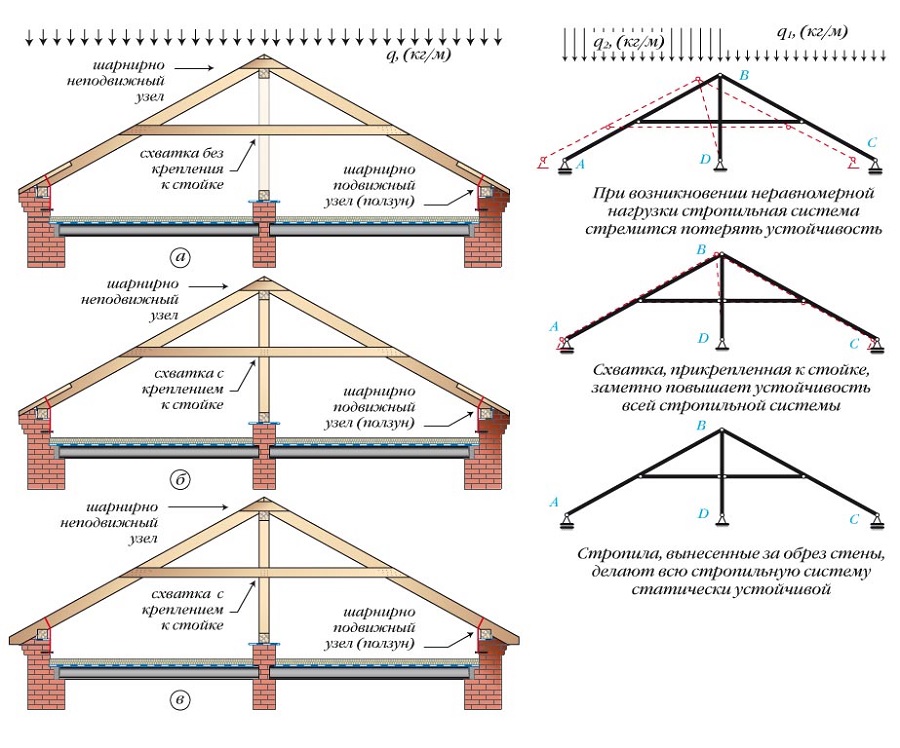
Rafters are subjected to constant (mass of roof, lathing, rafters, etc.) and temporary (wind, precipitation) loads. The main calculated parameter of snow load adopted in Russia for the middle lane is 180 kg / m ?. A snow bag can increase this figure to 400-450 kg / m ?.

If the roof slope is more than 60 degrees, the snow load is not taken into account.
The standard design value of the wind load for central Russia is 35kg / m ?.

If the roof slope is less than 30 degrees, the wind correction is not taken into account in the drawing.
The load parameters are adjusted for local climate conditions due to special factors. The total mass of the roof is calculated based on the amount of materials used and the total area of the structure.
The payload indicators for the system are introduced into the calculations if ceilings are suspended from the farms, water heating tanks, ventilation chambers, etc. are installed.
It is mandatory to calculate the strength of the rafters and the degree of possible deformation under various conditions.
Most often used as rafters: a rectangular beam with a cross section corresponding to the calculated loads, boards with parameters 5 × 15, 5 × 20 cm.
Most often, the choice is stopped on softwood lumber (spruce, pine) with a moisture content of 18-22%, treated with antiseptic agents and flame retardants.
To increase the rigidity and stability of the geometry of the truss system of a sloping roof, steel elements are sometimes introduced.
Installation and installation of the rafter system
Before you begin installation, you need to select the necessary materials and tools. In addition, it will be nice to get a drawing of the entire structure on paper. Of the materials you will definitely need: thermal insulation (mineral wool, for example), waterproofing, vapor barrier, wooden beams, roofing material, wood for lathing. Necessary tools: drill, screwdriver, hammer, nails, self-tapping screws, level, tape measure, measuring rod, etc.
The scheme of the four-gated roof assumes the presence of rafters, support bars, braces, and other elements necessary to give rigidity to the entire structure.
Rafters having a cross section of 5-15 cm will give reliability to the structure. When you go to buy lumber on the rafters, do not choose wet, twisted or with serious flaws.
Installation of the roof is always done from the bottom up. First of all, support beams (Mauerlat) are laid, on which rafters are subsequently installed. So you will get a lower frame, which should extend beyond the walls by 40-50 cm. It is not advisable that the protrusion of the rafters from the edges of the walls exceed the above limits, otherwise the object will look inharmonious.

Remember to check the installation using the building level.
If the building has wooden walls, support beams are not needed, since the upper crown of the log house will act as a Mauerlat.
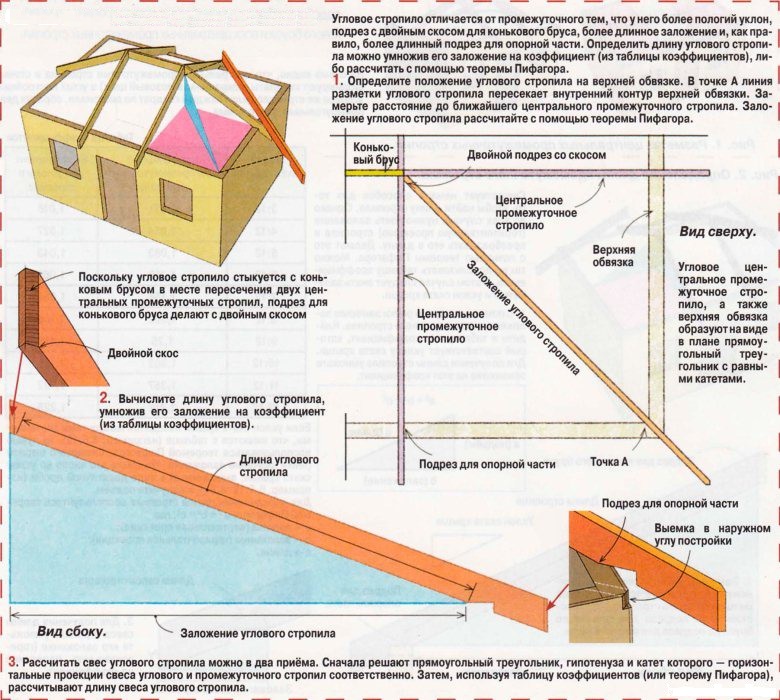
After, from each corner of the building, frame rafters are installed, they are called sloping legs (diagonal).The upper parts of the rafter legs, if necessary, can be supported by a system of braces and racks. Their main task is to unload the rafters by redistributing the load on the inner walls or supporting posts, and also to give the whole structure sufficient rigidity.
You should be especially careful about the nodes connecting the rafter legs to the Mauerlat. These are the main points that are responsible for the strength of the rafter system as a whole. The overhang of the four-pitched roof is regulated by the length of the diagonal rafters.

A special coefficient table with the length ratios and rafters for the different slopes of the roof slope presented in it will help. In one of its columns are the coefficients for the intermediate, in the other for the corner rafters. In order to calculate the desired length of the rafters, multiply the laying by a factor. You can easily find such a table on the Internet.
In those places where there are no load-bearing walls, the heels of the rafters can be placed on the longitudinal beams (side runs). In addition, a beam is mounted in the center, it is mounted on three supports: in the middle and at both ends.
If you have a large roof area, you can’t do without arranging truss trusses that will take on part of the load from the rafters. Truss trusses need a puff on which they will rest. Sometimes they can be fixed on existing transverse or longitudinal beams.
The parameters associated with the height and degree of roof slope are determined precisely by the height of the sloping rafters and the horizontal upper beam (ridge run).
After installing the rafter guides, proceed with the construction of the main frame. Fix the inclined (outdoor) rafters to the support beams, as well as the ridge run.
They should be installed in increments of 40-50 cm, not more. In case the gaps are too large, the rafter system may not withstand the loads from the snow that has fallen. The layout of the roof system of the gable roof must necessarily take this into account.

Fasten the inclined rafters together about a meter away from the upper rafter beam. This can be done using boards with a cross section of at least 4 * 12 cm.

It is not necessary to select the outdoor rafters strictly in length, because they will most likely have to be cut. The main thing is to ensure that they are not too short.
Key recommendations for installing a hip structure:
- in order to minimize the probability of errors occurring, use not a tape measure when measuring, but a special measuring rail;
- outline the center line along the upper trim of the end wall. After that, measure half the thickness of the ridge beam, draw a line for the placement of the first of all the central intermediate rafters;
- combine the end of the rail and the line of placement of the rafters that you marked a little earlier. On the other end of the measuring rail, copy the line of the inner contour of the side wall (thereby you will lay the intermediate rafters). Transfer the line of the external contour of the wall and the overhang of the roof to the measuring rail;
- to determine the future location of the second of the central rafters, move the measuring rail to the side wall, transfer to it the desired laying of the rafters from the inner corner of the upper trim;
- repeat the entire algorithm of actions in each of the corners. Following this pattern, you will determine the location of the ends of the ridge beam, as well as all the central intermediate rafters.
After installing the rafter system in accordance with the plan, make a crate, vapor barrier, waterproofing, counter-lattice, as well as roof insulation.
The final stage of the construction of a gable roof
After mounting the entire structure, the four-pitched roof (like any other) involves the creation of a crate. For this purpose, use wooden boards with a thickness of 50 or 40 mm. The main thing is that the material is high quality and well dried.
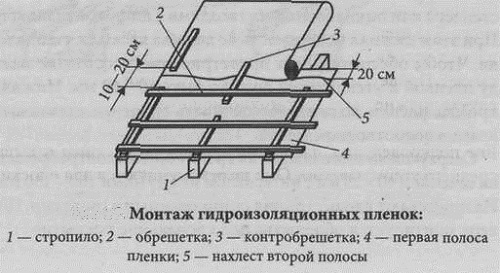
Before the device of the crate, it is necessary to lay a film that insulates the roof from steam and humidity. Such a film is attached using a stapler. In addition, in no case should one overlook the thermal insulation, which should be equipped in the attic. Thermal insulation is necessary to maintain normal temperature conditions in the building. And after that, the installation of a four-pitched roof is made.
And the last stage is the laying of the roofing. In the choice you are not limited, be guided by your own taste, material capabilities and design features of your roof. The main thing is to attach the material firmly and accurately enough so that rain cannot penetrate into the room through the joints, and the wind tear off roof fragments.
The scheme of the rafter system of the hip roof is very complex, as has already been said above, but do not be scared. The most important thing is to make all the calculations and measurements correctly, and also not to make a mistake with the markup. Having thoroughly understood this once, you can easily repeat a similar construction. Of course, it will be quite difficult for one person to cope with the upcoming amount of work, so a couple of assistants will not hurt.



Alas, no comments yet. Be the first!