It is not so difficult to get a beautiful, reliable and durable roofing for a roof if metal tiles are installed. Of course, it is better to entrust such work to a professional, but it is possible to do it yourself with due diligence, the main thing is to know the installation technology, which will be described below.
Content
General installation rules
In order to achieve a positive result, you need to check how much the resulting "skeleton" of the roof corresponds to the project. In this case, it is advisable to check the correctness of the dimensions, and if defects are found, then correct them. One of the simplest options is to measure the slope diagonals. If the numbers are different, this indicates a slight bias. If it is not possible to eliminate the skew, the laying should be done so that the line of tiles coincides with the lower edge of the crate.
Before laying metal, it is advisable to make sure that the minimum angle of inclination of the slopes is more than 14 degrees, and the old roofing has been completely removed.
Gutter gutters are held using special hooks that must be installed before the roofing works. Fixing of fastening is carried out only by galvanized screws.
The installation of individual elements of the roofing is done from the bottom up, and to prevent moisture from seeping into the insulating material, waterproofing is used. Warm air carrying water vapor will rise from the living quarters to the roof, only vapor barrier will help protect against it.
How to handle metal
The metal tile is quite durable, but only as a roofing material. When transporting and installing it, certain rules must be observed:
- The installation instructions for metal tiles recommend that you carefully load and unload this material, and make sure that its surface does not receive mechanical damage during transportation.
- Material is transported in tight gauntlets. Keep sheets should be the length of the edges. Metal tile cutting should be performed with a hacksaw, special scissors or an electric saw. In the latter case, a tool having carbide teeth is required.

For cutting sheets, it is forbidden to use an angle grinder using abrasive disks.
- Before fixing the metal, you need to check the protective layer. If there are defects, then they must be treated with a special paint. This will protect the metal from corrosion. Exactly the same operation is performed at the cut site.
- During work with metal, as well as when cutting sheets, metal chips are formed. You can only remove it with a soft brush, as other options will cause damage to the protective layer, exposing the metal. Surface contaminants must be removed using a non-aggressive agent, and solvent-based substances, on the contrary, are not recommended. The situation is similar with abrasive compounds, which can easily damage a thin layer of protective coating.
- It is necessary to clean the metal roof without the use of crowbars, scrapers or snow shovels, which can damage the roofing material, and therefore reduce the life of the entire coating.
- Installation instructions for metal involves the use of soft shoes during work. When moving along profiled sheets, you need to step only in the deflections of the waves, under which there is a wooden beam. It is not recommended to transfer weight to the ridges, as this will lead to deformation of the material.
How to use screws
The first thing to note is the installation method. The screws are screwed tightly, but so that they are only partially pressed into the gasket. The fasteners themselves are installed in the deflection of each wave along the perimeter of the ramp, after which the sheets are fixed to the crate bar so that the screws are arranged in a checkerboard pattern.

In the usual case, the self-tapping screws should be placed strictly vertically in order to uniformly press the seal, however, in places of overlap, it is allowed to screw them at an angle, since this allows the sheets to be pulled closer to each other.
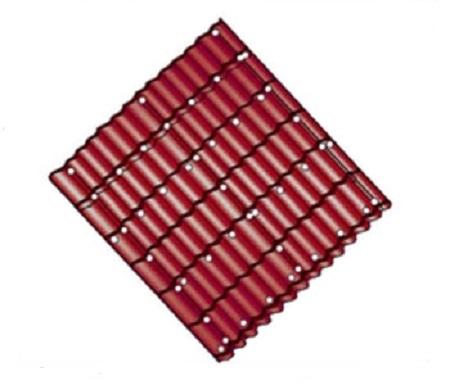
Installation instructions for metal tiles require consumption of up to 8 screws per m2, and for attaching accessories you will need more than 3 screws per meter. All fasteners must be made of galvanized steel and have a special washer with sealing material. Otherwise, moisture may enter the roofing cake, which will lead to corrosion of the metal sheets. It is obvious that the service life of the roof will decrease significantly and the fastening strength of the sheets will not be too high.
For mounting accessories, shear waves and a pitch of at least 35 cm are chosen. Self-tapping screws are best twisted using a drill or a screwdriver at a low speed of rotation.
Sheet Measurement
This operation is performed before laying the metal tile. The length of the sheets is selected taking into account the length of the slopes. When there are protrusions, it is also necessary to take into account the step of the sheets, otherwise the tile pattern on the transition sections may not coincide.

For stepped slopes, the length of which is more than 6 meters, you can use sheets of different sizes. When the flooring is made on a ramp, it is necessary to take into account the overlap length of 13 cm. In the event that a larger overlap size is required, this should be discussed with the supplier.
When sheets of the 1/1025 type are used (the second digit shows the usable width, expressed in mm), it is necessary to take into account the presence of an additional bend, which not only prevents the edges of the sheets from sprawling, but also simplifies installation. This circumstance is of interest when ordering tiles with different lengths for installation on one slope. For roofs of complex configuration, the installation instructions for metal tiles require careful measurement. Only after it can we begin to calculate the number of sheets.
It is simple to calculate: the entire length of the cornice is divided by the useful width of one sheet, for example, 1025 mm, after which it is rounded up to the nearest whole number. Then you should multiply the result by the number of slopes. It should be noted that the useful width of the sheet located on the edge is chosen equal to its full width.

When you need to cover a tented roof, it should be remembered that scraps of metal sheet cannot be used on an adjacent ramp, since they have a transversely corrugated pattern.
Waterproofing
If you ask about the installation of the roof from those who know how to put metal tiles correctly, then they will certainly say that in addition to the coating itself, it is necessary to protect the cold. To do this, a comprehensive insulation is used, but the properties of this material when wetted are significantly reduced, therefore it is necessary to create reliable protection against moisture. It is performed in two layers, with waterproofing being performed from above, and vapor barrier - from below.
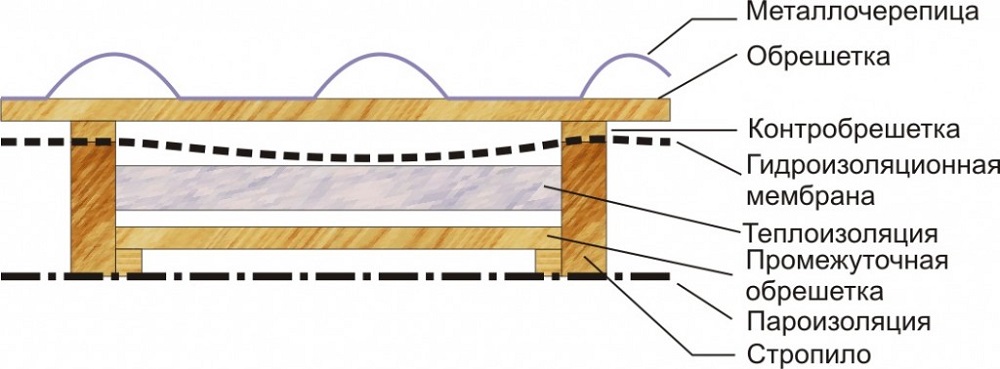
From the figure it is obvious that it is waterproofing that allows you to retain condensate, which drains or evaporates, and does not settle on the roof structures. Canvases of material overlap, starting with the eaves overhang. The overlap is usually 15 cm.

The material does not need to be pulled tight between the rafters. It is better if it hangs 2..3 cm below the level of load-bearing structures. On both sides of the ridge, at least 15 cm of the film must be stretched into the bend.
The technology of installation of metal tiles suggests that in the area of the eaves overhang the insulating material is laid so that the accumulated condensate can not get on the roof structure, and the air flow, on the contrary, easily approaches the top of the flooring. Near the gable overhang, the film is laid at a distance of 20 cm from the extreme point of the wall structure. After completing the installation of waterproofing panels, a crate is installed. It is nailed already on top of the material and is drawn from boards with a cross section of more than 32x50 millimeters.
Arrangement of ventilation
Ventilation is another important element of a proper roof. It avoids the occurrence of rotting, even if the structural elements were not treated with antiseptics, because due to the strong current of air all the condensate evaporates from the surface of the waterproofing material.
Installation instructions for metal involves the creation of a counter-lattice through the use of bars nailed over the rafters. This is a counter-lattice, which just creates the necessary gap for air between the elements of the crate and the waterproofing material stretched over the rafters. Humid air passes through the under-roof space and the ventilation in the ridge of the roof is removed. When the ridge has a simple shape and does not involve the installation of any device, the air flow can exit through the end face of the shaped ridge.
The internal structure of the eaves should be made in such a way as to allow air to freely pass into the under-roof ventilation gap. It is recommended that the thermal insulation material be laid along the slopes to the ridge itself, and the waterproofing can not be brought up to the ridge, leaving a gap of 10 cm. To prevent moisture from entering the insulation in this place, the metal tile is installed using a ventilation ridge or Top Roll ridge.

The height of the ventilation gap should be chosen within 5-10 cm.
Installation of the lathing
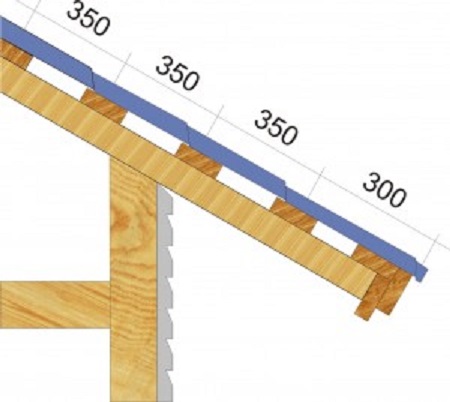
As is clear from the previous paragraph, the crate is laid on top of a thick slat (counter battens), designed to ensure unhindered passage of air under the roof layer. In the process of creating a crate, you must adhere to certain rules:
- Choose the thickness of the boards and the type of fasteners, taking into account the height of the tile profiles. Of particular importance should be paid to the length of the fastener in the case when the installation is carried out in peak waves.
- The minimum section of the boards is usually chosen at least 32x100 millimeters.
- The board facing the cornice should be thicker than the rest. In the case when it is planned to install roof tiles of types 2 and 3, the excess should be 1 cm, and for type 1 - 1.5 cm.
- Those who know how to lay metal tiles try to make sure that the step is a multiple of the size of the sheet. The entire structure is fastened to the rafters using nails of 2.8x75 mm, and their consumption should be 2 pieces per 1 intersection.
In the event that it is planned to use through exits to the roof, such as a fire hatch, ventilation truss or chimney, then additional reinforcement of the structure in these places must be done.
How to lay the topcoat
The first thing to note when talking about laying such a material is its fragility. It is easy enough to damage, so it’s better to move around the stacked sheets very carefully.You need to step into the deflection of the wave where there is a crate bar under the metal.
The capillary grooves of the previous sheet should be covered next, and the laying of the material can begin from any edge of the roof. Installation instructions for metal tiles recommend that when installing the coating from the right edge of the roof, lay the beginning of a new sheet under one of the waves of the previous one (i.e., the capillary groove will always be on the right).
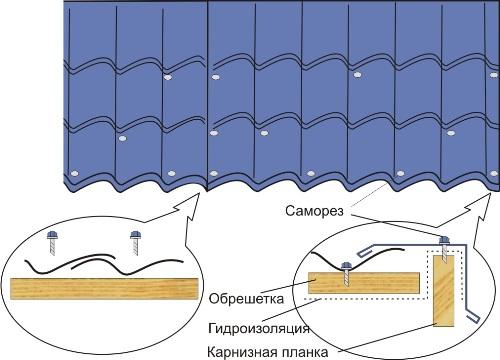
This installation simplifies the assembly of the roofing and avoids the sliding of the last sheet due to transverse corrugation.
The material must be placed along the line of the cornice so that it protrudes at a distance of 4-5 cm. Before starting work, you need to bait the first sheet on a self-tapping screw, which is screwed into the deflection of the wave at the ridge. After this, the second sheet is stacked. Then you need to make sure that all the folds are stacked correctly, and the bottom edge of the sheet forms a straight line. The sheets are fixed in the overlap using self-tapping screws, as shown above.

It must be remembered that fixing is possible only after at least 3-4 sheets are baited and fastened together, after which they are aligned along the cord along the ledge.
The following sheets are mounted as follows: first, fastening to the previous sheet is carried out, and then to the crate.
Concealed Mounts
Those who know how to lay metal tiles correctly can use a coating that has hidden fasteners. Such material also requires the use of self-tapping screws that are equipped with a press washer. It is worth noting that the fasteners themselves will not be visible, so here you can use ordinary galvanized sheets, which may not be painted.
The main difference when using this technology is that you do not need to make holes in the roof, since the screw is screwed into the existing one. The connection of the sheets is carried out through the use of grooves and mounting tabs, which should be located at the edges. The screws are hidden by the following sheet, etc. This installation option allows you to create a reliable and tight coating that is in no way inferior to the roof, the installation of which was carried out in the traditional way.
Mounting cornices
You need to know how to put the metal tile on the ledges correctly, since the installation technology in these places has several differences. It was already mentioned above that the edge of the sheet should protrude beyond the border of the cornice strip. This is to ensure that water flows directly from the roof into the gutter.

The extreme bar is made thicker for a reason. It is these 15 mm that allow it to withstand a higher load and not bend.
The sheets are fixed on the cornice through a single wave, and the attachment points are located along the cornice line. Usually they are 7 cm above stamping. If the cut is located at a distance of more than 13 cm from the extreme stamping line, an additional skate board with an increased thickness is mounted.
How to fasten a metal tile around pipes
When it is necessary to bypass a vertical obstacle, it is necessary to make sure that the water flowing down the slopes is intercepted and bypasses the obstacle.

If you plan to plaster the walls of the pipe, then you need to do this before performing roofing.
The pipe is surrounded by batten boards so that the coating is continuous. After this, the sheets adjacent to the pipe on the sides must be cut at a distance of 15 cm from the side of the pipe that faces the ridge.
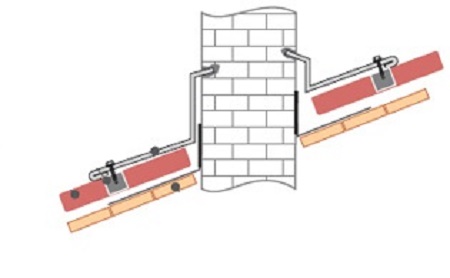
The cut itself is performed above the stamping line by about 8 cm, after which they begin to install the apron.
First of all, the abutment line is marked for the lower bar, which should be 15 cm higher than the metal tile. Then the pipe is chipped with a grinder and the lower bar is mounted. When it is installed, mark the side, after which the lower apron is closed with sheets of roofing.

Installation instructions for metal tiles allow alignment of the edges of the sheets with a mallet. This will allow the apron to lie more evenly.
The upper part of the apron is made so that it extends beyond the cut line of the sheets adjacent to the pipe by 20 cm. This element is obtained with an upward flanging, and all its components are connected according to the rules adopted when performing tin works.
Most common mistakes
Despite the fact that this section is placed almost at the end of the article, it should not be underestimated, since the information presented here is no less important than all of the above. The main problem for beginner roofers is fasteners. High-quality metal tiles can last 50 years, but ordinary fasteners will lose their positions much earlier, so you need to choose only those screws that are designed for use with metal tiles.
Those who do not know how to lay metal tiles can purchase self-tapping screws with a washer from ordinary rubber instead of a gasket made of ethylene-propylene rubber. The rubber will crack and the joint will lose tightness, so the quality of the coating will drop significantly.

Fastening to the top point is possible, but not in the case of metal tiles, since in such a situation it is difficult to ensure a reliable seal fit. On the other hand, if you tighten the self-tapping screw tightly, you can easily crush the metal.
Summing up a brief result, it must be said that the above is a rather detailed instruction for installing metal tiles, which will allow even a lay person to quickly understand the issue. If some points seemed unclear to you, then you can study other articles posted on our website.



Alas, no comments yet. Be the first!