Housing construction today is so diverse that sometimes constructed structures take on a completely bizarre, fantastic look. In particular, architects like to experiment with a roof that is made transparent, in the form of foliage of trees or a flower, and a platform for skateboarding - in general, their imagination is completely limitless. But we are somehow closer to simpler options, such as a gable roof. We will talk about what this is and what the roof system of the gable roof consists of - we will talk in this article.
Content
What is a gable roof?
It is this type of construction that is most popular in the construction of residential buildings, since with its help a sufficient attic space is created that does not require additional insulation. In addition, a gable roof is not so difficult to install, such as a four-gable roof, and also does not require huge investments for its installation.
A gable roof is a structure consisting of two rectangular planes connecting at the top with each other, and at the bottom with the walls of the house. The end part of such a building is usually built from the same materials as the walls of the building, sometimes an entrance to the attic is also built here.
Recently, it has become very popular to build an additional room in the attic space, which is often used as a summer guest room. Installation of the rafter system of the gable roof and the subsequent warming of the resulting premises allow you to create a full-fledged room, in which you can live both in summer and in winter.
All the advantages of gable structures
The main components of the rafter roof are Mauerlat and rafter legs, in addition, various struts, racks, crossbars, stops and laths help to make the structure strong and reliable. The drawing of a gable roof also includes a layer of insulation, vapor barrier, waterproofing and the roof itself. Thanks to all these elements, a gable roof has several advantages:
- simplicity of technical performance;
- low probability of leaks, as the design is solid;
- high profitability, because a relatively small amount of materials is spent on its construction;
- the possibility of arranging in the attic of a full-fledged residential area;
- ease of repair in case of defects;
- high strength and wear resistance.
The angle of inclination is an important component of a strong roof
The value of the angle of inclination is determined depending on the weather conditions of the region of residence, on the characteristics of building materials and on architectural requirements.
For example, in areas where heavy rainfall is normal, the roof is always angled. This is necessary so that snow mass accumulates on its surface as little as possible, which can lead to the collapse of the building. In regions with strongest winds, gently sloping roofs are most often built, since the wind pressure on such structures is significantly reduced.

In whatever climatic zone the dwelling is located, the gable roof truss system cannot be built at an angle of less than 5 degrees!
Recommendations for calculating the gable roof area
Calculating is not as difficult as it might seem at first glance, but this painstaking process requires perseverance - all data must be double-checked at least three times. Agree, no one wants to spend money on completely unnecessary building materials.
In some cases, the measurement of the roof area can be complicated by some “obstacles”, for example, the presence of an attic or an unusual form of roof - here it is unlikely to get by without the help of a specialist. We will consider the calculation of the area on the classic version of the roof with two slopes:
- First, determine the length of each slope, it is equal to the distance between the lower edge of the ridge and the extreme point of the cornice;
- We take into account all the elements of the roof: parapets, overhangs, firewalls and other structures that create additional volume;
- We determine the type of roofing material for which we will calculate the area;

It should be borne in mind that in the case when the roof is covered with a roll or tile type of materials, the length of each slope will become less by about 0.7 m.
- Elements such as ventilation shafts, windows and chimneys are not taken into account;
- When taking into account all the details, the area of each slope is calculated, we calculate the slopes: we multiply the elements of the slopes by the cosine of the angle of inclination of the roof, and the area is calculated only by overhangs.

For the convenience of calculating and obtaining the correct data, it is best to calculate the area of each element separately, and then add up the numbers.
The roof area is calculated, with the roof determined - it remains only to understand in detail all the structural elements, such as rafters, Mauerlat, side / ridge runs, struts and braces, as well as diagonal ties, after which you can begin to calculate a specific type of rafter system.
Hanging and layered rafters
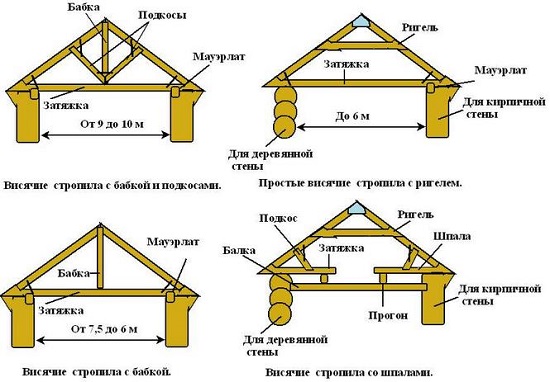
Of course, such a structure as a rafter system with a do-it-yourself gable roof, in the minds of many, seems like something very complicated and time-consuming. But if you carefully consider the construction of such a structure and study the necessary material in advance, the question will remain only in the “number of hands” that you will need for the construction process.
Let's start with such a component roof as hanging rafters. These bars have only two points of support - the walls, so the main loads acting on them are bending and compression. The weight of the roof, as well as the effect of snow and wind, is transmitted to the walls through the hanging rafters so that this pressure is compensated, the rafters are connected by a puff of metal or wood. It can be placed at any height, but the higher it is, the stronger and stronger it should be.
The roof rafters are the beams, which have an intermediate support resting on the inner wall of the house. The main impact on this design is bending. The supporting structure of the roof is performed only from the pylon supports when the distance between them is not more than 6.5 m.

One and the same roof can consist of overhanging and hanging rafters at the same time: where there is an intermediate support - the rafters are erected, and where there is no - hanging.
Mauerlat and runs
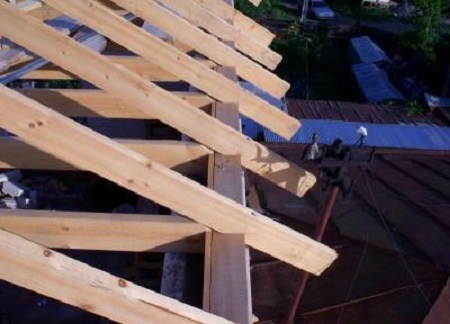
The lower part of the rafters in houses built of timber, rests on the upper crown, and in buildings of brick or foam concrete - on a special beam, called Mauerlat. For its installation, a waterproofing material is placed on the inside of the bearing wall, on which the Mauerlat rests. The length of the beam can be equal to the length of the wall of the building, and can be adjusted to the size of each rafter leg - it’s even more economical.
A ridge run is a bar to which the upper parts of the rafters are fixed. That is - it is a skate of the roof. Its length depends on the length of the roof, so for its construction both a solid array and several logs are used.
Side runs are needed for additional support of the rafters, their emphasis is also placed on the pediments of the building. The ends of such runs are sometimes extended beyond the gables, thus unloading consoles are obtained, as a result, the pressure of the roof on the central part of the run decreases significantly.

If the roof of the building is built from heavy materials, for example, from natural tiles, then the side girders are made in the form of a rocker arm, for this the logs are slightly suspended and bent.
A little more about the important elements of the roof
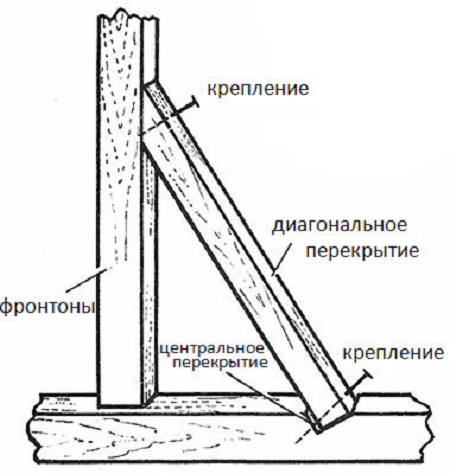
Additional diagonal ceilings are called braces, with the help of which the rafter system of the gable roof is strengthened, and the characteristics of resisting the wind with gables are increased. The upper part of the braces rests on the pediments, and the lower - on the central ceiling.
Braces are necessary to reduce the load on the rafters, their installation at an angle of 45 degrees and above can significantly reduce wind loads and the pressure of snow masses on the roof, so in the northern regions of the country such roof elements are simply irreplaceable.
If the roof consists of slopes of various sizes, then their angle of inclination will not be equal. Consequently, for the greatest strength of such a design, vertical posts are erected at the “fracture” sites on which the lateral runs are supported. Most often, such structures are built for attic rooms.
In areas characterized by constant strong wind, rafter systems are mandatory reinforced with diagonal ties, which are boards whose thickness is from 25 to 50 mm. The bottom edge of the board is fixed to the heel of the rafters, and the top to the middle of the opposite rafters.
The correct calculation of materials for the rafter system of a gable roof
Do not be afraid to independently make all the necessary calculations, because the size of a gable roof, especially if it has the shape of an isosceles triangle, without deep mathematical knowledge, anyone can calculate.
So, we will consider the calculation of the rafter system of a gable roof using a specific example. The house for which you want to build a similar design has a width (Wir) 4m, a length of 6m, and the angle of the rafters (Y) should be 120 degrees. The roof will be built of metal, the distance between the rafters is planned at 1 meter.
To begin with, we find the height of the central support (C):
C = 0.5? Wir / tgY / 2 = 0.5? 4 / 1.73 = 1.2m
The length of the rafter leg (Ds) is calculated by the following formula:
Ds = 0.5? Wir / sinY / 2 + 0.5 = 2.8m

0.5 in this formula is the allowance for the roof visor, it must be taken into account without fail!
Roof area (Pc) = D? Ds? 2 = 33.6 m2
It turns out that it is precisely this number of sheets of metal that you will need for roofing.
The distance between each plank of the crate (Pn) is conventionally taken as 35 cm, which means:
Lathing length = Ds / Pn? D? 2 = 96 linear meters
With a house length of 6m and a distance between the rafters of 1m, we will need 7 rafter legs, which means that the number of timber for them and for the Mauerlat is no less than:
Bar length = (2? Дс + Шir + C) = 75.5 r.m.
The required amount of other materials is calculated in the same way. When all calculations are done and the required volume of building materials is purchased, we proceed to the direct construction of the gable roof.
We build a gable roof with our own hands
So, now we have come close to such a moment as the installation of a rafter system of a gable roof. This process begins with the construction of beam ceilings.
There are only two options for their installation:
- If the attic is not planned to be used as housing, then boards with a size of 50 are suitable for floors? 150 mm.
- To equip the attic, a beam with dimensions of 150? 150 mm, and each of them is laid precisely on the bearing walls of the building.This is the only way to create a truly reliable and durable attic structure, only the cost of its construction will be an order of magnitude more expensive than the construction of an ordinary attic. But the living area of the house will increase significantly - decide what is more important for you and think through everything to the smallest detail.
Floor beams are laid across the entire width of the building, leaving 500-600 mm per projection from the supporting walls - this will protect the wall from water flowing from the roof slopes. Around the entire perimeter of the house, a board is laid on the beams, which will become the basis for the racks of the walls of the second floor - the attic.
For the construction of all roof elements, the following mounting materials are used:
- wood screws
- nails
- screws
- dowels,
- wire,
- metal squares.
Once the racks are installed, you can begin to equip the rafters.
Rafter system attic
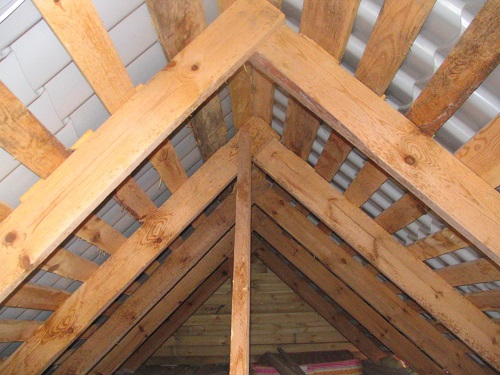
Such a rafter system with a do-it-yourself gable roof is the simplest in technical performance. Why? Firstly, because it is not necessary to calculate the device of rafters depending on the material and location of the insulation.
And secondly, we will not need the size of the section either.

The easiest way to "tame" a gable roof of the correct triangular shape, because all its components will have identical dimensions.
In addition, this system has several indisputable advantages:
- the cross section of rafters and bars has a high margin for bearing capacity;
- this form is very reliable, since the load on the structure is distributed evenly, and the risk of deformation of the rafter legs disappears;
- a triangular rafter system is an independent design, therefore, if there are malfunctions in other elements of the building, it remains intact;
- the beam, laid with a small ledge, also serves as a frame for the entire weight of the roof - and this is an additional reliability of the whole building.
Rafter system of an attic
It will be a question of only a single-level attic, since it is quite possible to build it with your own hands. The construction of more complex structures is recommended to entrust to experienced professionals, as it is easy to make mistakes in the calculations without their help, and the result will be disastrous.
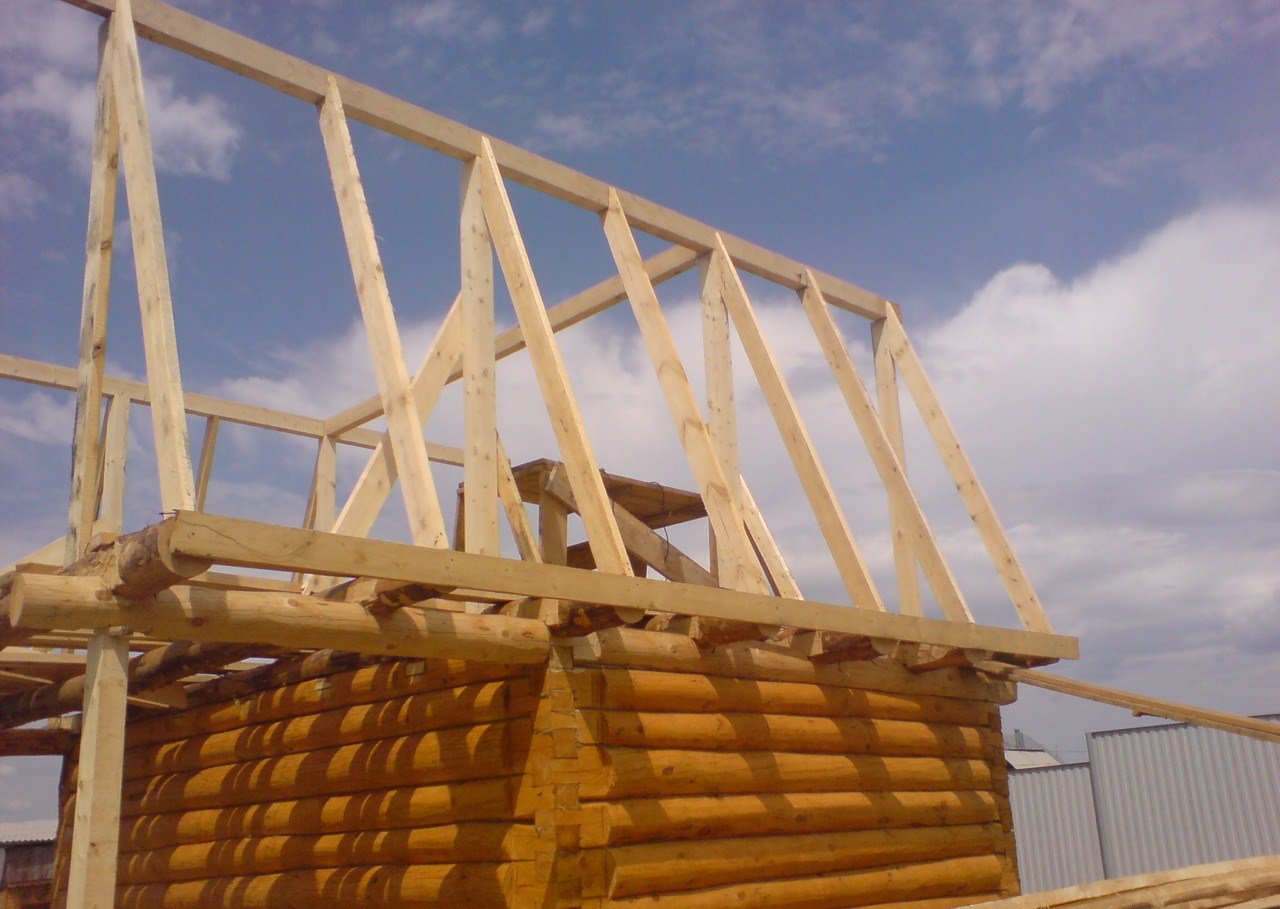
A board is placed on the beam, from which the lower part is sawn off - this is done so that there are no gaps between the beams and rafters.

On the board (100 mm) you need to lay the beam, draw a line at the place of their joining. Then, along this line, the board must be sawn, as a result of which a skewed board should be obtained, which will fit snugly to all the floor beams.
Further, the rafter system of the gable roof involves the installation of the resulting boards at the intersection of the two rafters. Then you need to draw a line again and cut off the unnecessary part from the board.
Again, along this line we make a cut and so on. The implementation of these actions will ensure tight and accurate fastening of the upper part of the rafter system, the installation of which you can proceed. Using the lining, fasten each row of rafters at the top (on the ridge), finally fasten the resulting strapping with a special crossbar, which will act as an overlap for the ceiling.

The stiffness of the structure being built directly depends on how firmly the rafters are fixed between themselves. It is best to use special metal linings - so you can achieve the greatest strength of the roof.
When all the rows of rafters are fixed, you can begin checking the correctness of the creation of the pediments - they must be located strictly at right angles. A construction plumb line is useful here - an indispensable thing for such situations.
When the correct design does not raise any doubts, it is possible to begin the capital fastening of all the parts together, soft wire, nails or staples will help.
Now you need to pull the twine along the upper point of the gables, so it will be more convenient to set the middle rafters at a single level.

To exclude the possibility of sagging of the rafter system, it is necessary to strengthen the middle rafters with special struts.
The installation of struts usually does not cause any difficulties: their lower part is fixed to the attic rack, and the upper one - to the middle of the rafter leg, where you need to cut a groove of the required depth. To fix the structure, you need to choose nails from 200 mm.
That's all - do-it-yourself roof rafter system is ready! It remains only to build a crate and cover the roof with a roof, but these are completely different technologies, which will be discussed in the next article.



Alas, no comments yet. Be the first!